
A comprehensive guide to configuring Instances and Operation Modes in SAP. Learn how to create, change, and switch operation modes, and how to allocate instances to servers and services.
Instances and Operation Modes
Each instance provides a configurable number of work processes that are responsible for the processing of the tasks that are transferred to the system. These may include executing a transaction in a user dialog or processing a background job, for example. Work processes are divided into various types based on the tasks for which they are reserved:
- Dialog work processes
Execute ABAP dialog programs. - Batch work processes
Execute background jobs. - Update work processes
Control asynchronous database changes. - En queue work processes
Execute lock operations. - Spool work processes
Process print data.
Creating Instance Definitions
To use operation modes, you must create the instances of your system as instance definitions by following these steps:
1.Enter Transaction RZ04 in the command field and press the (Enter) key (or select the menu option Tools • CCMS • Configuration • RZ04—Operation Modes/Instances).
2. Click on Instances/operation modes (see Figure 1).

3. Click on the Create New Instance icon ![]() (see Figure 2).
(see Figure 2).

- The instance data must be maintained on the next screen (see Figure 3)
- Enter the name of the server under Host Name.
- Enter the system number in the SAP system no. field.
- Enter the name of the instance profile under Instance profile.
- When you’ve finished, click on Save


Creating an Instance for the First Time
If no instances have been created, and you want to create the current instance as an
instance definition, fill in the Host Name and SAP system no., and click on the Current
settings button. The system automatically determines the data required from the cur-
rent instance configuration.
- A dialog box appears, in which you must specify how the work process types are to be distributed (see Figure 4). Because these settings are to be defined later by operation modes, enter the placeholder “*” in the Operation Mode field, and leave the other settings unchanged.
Click on Save .

- Click on No in the dialog box that opens (see Figure 5).
- The instance definition is created, and you return automatically to the initial screen. The table displays the production instances, their detailed data, and the distribution of work processes (see Figure 6). Click on Save .

Creating Additional Instance Definitions
At this point, you can add more application servers as instance definitions. However,
the corresponding instances must already be installed and running on a separate server.
Defining Operation Modes
Next, create the operation modes you want your system to have:
- Call Transaction RZ04.
- Click on the Create Operation Mode icon
 (see Figure 7).

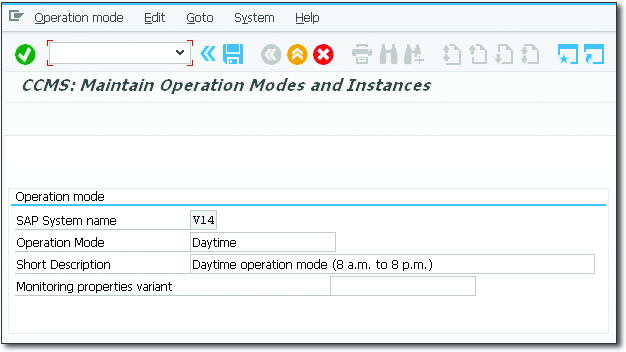
- On the next screen, enter a name (e.g., “Daytime”) in the Operation Mode field, then enter a description that is as meaningful as possible in the Short Description field (see Figure 8). Click on Save .
- You return automatically to the initial screen of the existing operation modes. The operation mode you just created is now displayed in the list of Productive operation modes (normal operation) (see Figure 9). Choose Create Operation Mode to create another operation mode.

Distinguishing Between Different Operation Modes
Production operation modes refer to normal SAP operation, while test or special opera-
tion modes are used, for example, for development systems, test systems, or for specific
tasks (such as system maintenance or year-end closing activities).
- Enter a name (e.g., “Nighttime”) and a Short Description for the operation mode (see Figure 10), and click on Save .

Both definitions you created are then shown in the list of Productive operation modes (see Figure 11).

Useful Operation Modes
The operation modes that will prove useful for your enterprise will be determined by
the question of whether or not your system is used differently at different times. In an
enterprise with a single location, for example, it may make sense to define one opera-
tion mode for daytime operation and one for nighttime operation, with these two
modes differing largely in terms of the distribution of dialog and background processes.
However, if you need to ensure smooth operation in dialog mode 24/7 (e.g., because
various locations in time zones that are very far apart need access to the system), the
distribution described here would not make much sense. In a case like this, you would
need to base your operation modes on the working hours and needs of all locations, for
example.
Assigning Operation Modes and Defining Work Process Distribution
After you’ve created the operation modes, you can assign these to the instance definitions:
- Again, call Transaction RZ04.
- Click on the Instances/operation modes button (refer to Figure 11).
- On the following screen, position the cursor on the first operation mode row
(entry *; see Figure 12), and click on Choose .
.

- In the dialog box that opens, click on the Other operation mode button.
- Enter one of the operation modes you created (e.g., “Daytime”) in the Operation mode field, or use the input help to select an operation mode. You can use the
 and
and  buttons to change the number of work processes (see Figure13). When you’ve finished, click on Save .

Changing the Number of Work Processes
In previous releases (SAP NetWeaver 7.3 or lower), the number of dialog work processes is always determined by the other work process types. In other words, you can’t configure the dialog processes using the plus and minus buttons. You can, for example, reduce the number of batch processes so that the number of dialog processes increases. In newer releases, the configuration is more convenient. When you’re done with the configuration, always confirm that the number in the Max. Work Procs field is identical to the number displayed in Max. Configurable.
- Repeat steps 3 and 4, and select the next Operation Mode (e.g., Nighttime).
Configure the work process distribution, and click on Save .
Minimum Number of Dialog Work Processes
Note that an instance must have at least two dialog work processes. The system won’t allow you to configure fewer dialog processes for any operation mode.
- In the table view, position your cursor on the * entry, which isn’t needed, and select the Instance Delete entry menu option to delete it (see Figure 14).

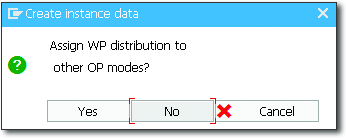
- Choose Yes to confirm the dialog box in Figure 15, and then choose Save

By following these steps, you’ve assigned the relevant operation modes to the instance and defined how the work processes are to be distributed for each operation mode. Next, you need to configure time-dependent operation mode switching.
Configuring a Time Allocation for Operation Modes
The operation modes and associated work process distribution are subject to time-dependent switching. To define how this switching is to be executed, follow these steps:
1.Enter Transaction SM63 in the command field and press the (Enter) key
(or select the menu option Tools • CCMS • Configuration • SM63—Operation Mode Calendar).
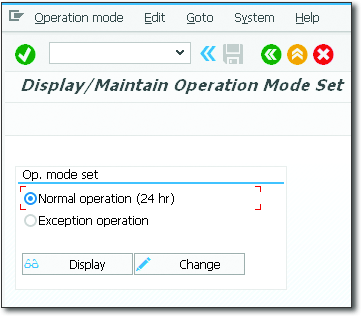
2. Select Normal operation (24 hr), and click on the Change button (see Figure 16).
3. On the next screen, you define the time interval for which the operation mode is to be valid. Position your cursor at the start of the period (e.g., 08.00 – 09.00, if daytime operations are to start at 8:00 am; see Figure 17). Select the Operation mode • Select interval menu option, or press the (F2) key.

4.Then position your cursor at the end of the interval (e.g., 19.00 – 20.00, if day- time operations are to end at 20.00, or 8:00pm). Again, select Operation mode • Select interval, or press the (F2) key.
- The interval has been selected. Click on the Assign button. In the dialog box that opens, use the input help to select the relevant operation mode, and click on Continue
 (see Figure 18).

- The assignment is shown in the table (see Figure 19).
- Repeat steps 3 to 5 to assign an operation mode to the other times.

- When you’ve finished (see Figure 20), click on Save .
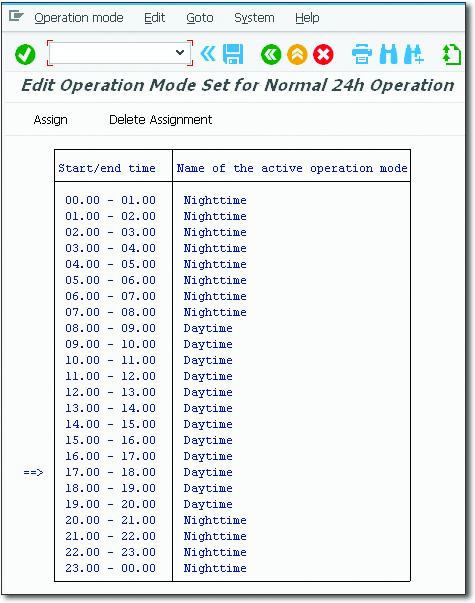
- The status bar displays the message Operation mode set saved, which indicates that the operation mode set has been saved for normal operation.
From this point on, the operation modes will be switched using this timetable. A log entry is generated in the system log (Transaction SM21) when a switch is made. Both the old and new process types are recorded for each work process that is switched. However, the type of a work process can’t be switched until the process becomes available. In other words, a delay may be experienced while the work process is
still occupied. For example, if all background processes to be switched are still executing jobs, the processes are switched one by one, as soon as the corresponding jobs have been completed. Processing isn’t interrupted, and normal system operation proceeds without disruption during switching.
Manual Switching of Operation Modes
You can switch operation modes manually if necessary. This function is required if, for example, you want to switch to a special operation mode, use a new operation mode immediately, or nighttime operations need to be brought forward for an important reason. To switch operation modes manually, follow these steps:
1.Enter Transaction RZ03 in the command field and press the (Enter) key (or select the menu option Tools • CCMS • Control/Monitoring • RZ03—Control Panel).
2.Position the cursor on the application server whose operation mode you want to select (see Figure 21). Click on Choose operation mode.

- Place the cursor on the operation mode to which you want to switch (see Figure 22), and click on Choose.

4. The view switches back to the Display Server Statuses and Alerts screen. Your selected operation mode is now displayed as the Active Operation Mode. Position the cursor on the relevant server, and select the Control • Switch operation mode • Selected servers (see Figure 23).

- Click on Yes in the dialog box that opens (see Figure 25).

The operation mode has now been switched. You can verify the work process distribution in Transaction SM50 (see Section 2.4.3). The manually selected operation mode remains active until the next scheduled switch point.