Learn how to enable X11 forwarding in RHEL, SUSE, and Amazon Linux with our comprehensive guide. Discover the steps to securely display graphical applications remotely
To enable X11 forwarding from Red Hat Enterprise Linux (RHEL), Amazon Linux, SUSE Linux, and Ubuntu server for GUI-based installations on Amazon EC2, follow these steps.
Step 1: Install required X11 packages.
To install X11 packages, use this command depending on your OS release and version:
You don’t need to install xclock or xterm packages since they are already installed for testing X11 forwarding.
Amazon Linux 2:
To install X11 related packages:
sudo yum install xorg-x11-xauthTo install X11 testing tools:
sudo yum install xclock xtermRed Hat Enterprise Linux 8:
To install X11 related packages:
sudo yum install xorg-x11-xauthTo install X11 testing tools:
sudo yum install xtermNote: I found the xorg-x11-apps package in the CodeReady Linux Builder Repository for RHEL8, so I didn’t install it. Instead, I used xterm to test X11 forwarding without xclock.
SUSE Linux Enterprise Server 15 SP1:
To install X11 related packages:
sudo zypper install xauthTo install X11 testing tools:
$ sudo zypper install xclockUbuntu Server 18:
To install X11 related packages and tools:
sudo apt install x11-appsStep 2: configure X11 forwarding
To enable X11 Forwarding, change the “X11Forwarding” parameter using vi editor to “yes” in the /etc/ssh/sshd_config file if either commented out or set to no.
sudo vi /etc/ssh/sshd_configTo Verify X11Forwarding parameter:
sudo cat /etc/ssh/sshd_config |grep -i X11ForwardingYou should see similar output as the following:
X11Forwarding yes
To restart ssh service if you changed the value in /etc/ssh/sshd_config:
Amazon Linux 2, RHEL 8 and SUSE Linux OS:
sudo service sshd restartUbuntu Servers:
sudo service ssh restartStep 3: Configure putty and Xming to perform X11 forwarding connect and verify X11 forwarding.
First, log in to your Windows bastion host. Next, open a new PuTTY session and use your private key or password for authentication, following your organization’s setup. Finally, try the xclock or xterm command to see X11 forwarding in action.
- Open the XMing utility you installed on your Windows bastion host and make sure it’s running.
- First, go to the ‘Session’ option in the ‘Category’ panel on the left. Next, set the ‘Host Name’ to your private IP address, the ‘Port’ to 22, and the ‘Connection Type’ to SSH. Remember to use the Private IP of your EC2 instance when connecting from within the VPC or network later on.
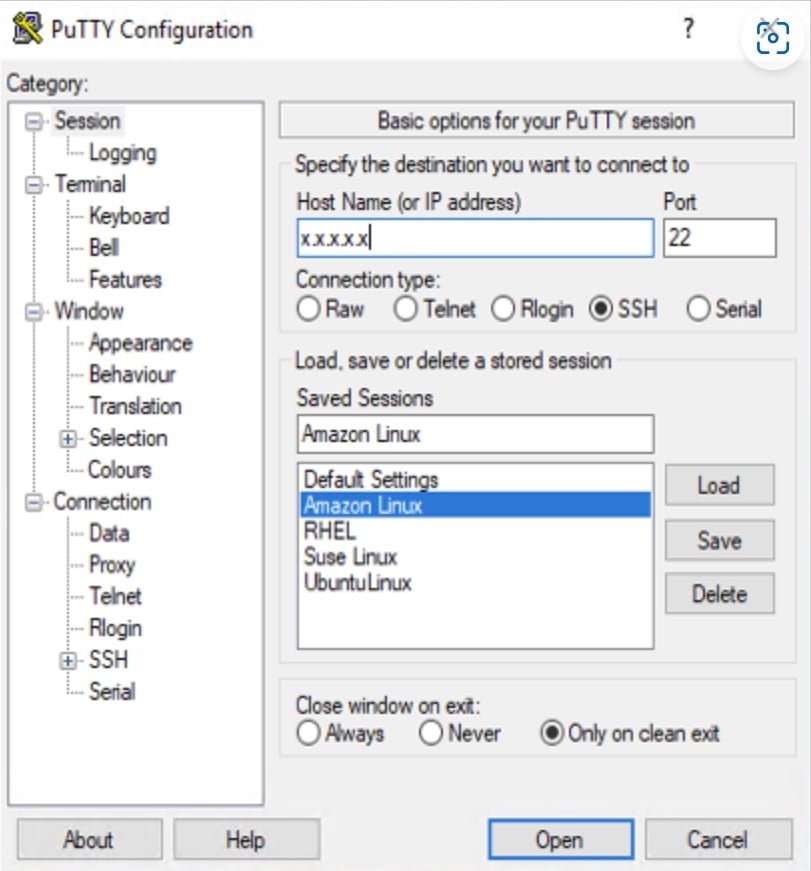
- Go to Connection, and click Then, set Auto-login username as ec2-user, Ubuntu (Ubuntu OS), or whichever user you are allowed to logging in as.
- Go to Connection, select SSH, and then click Then, click on Browse to select the private key generated earlier If you are using key based authentication.
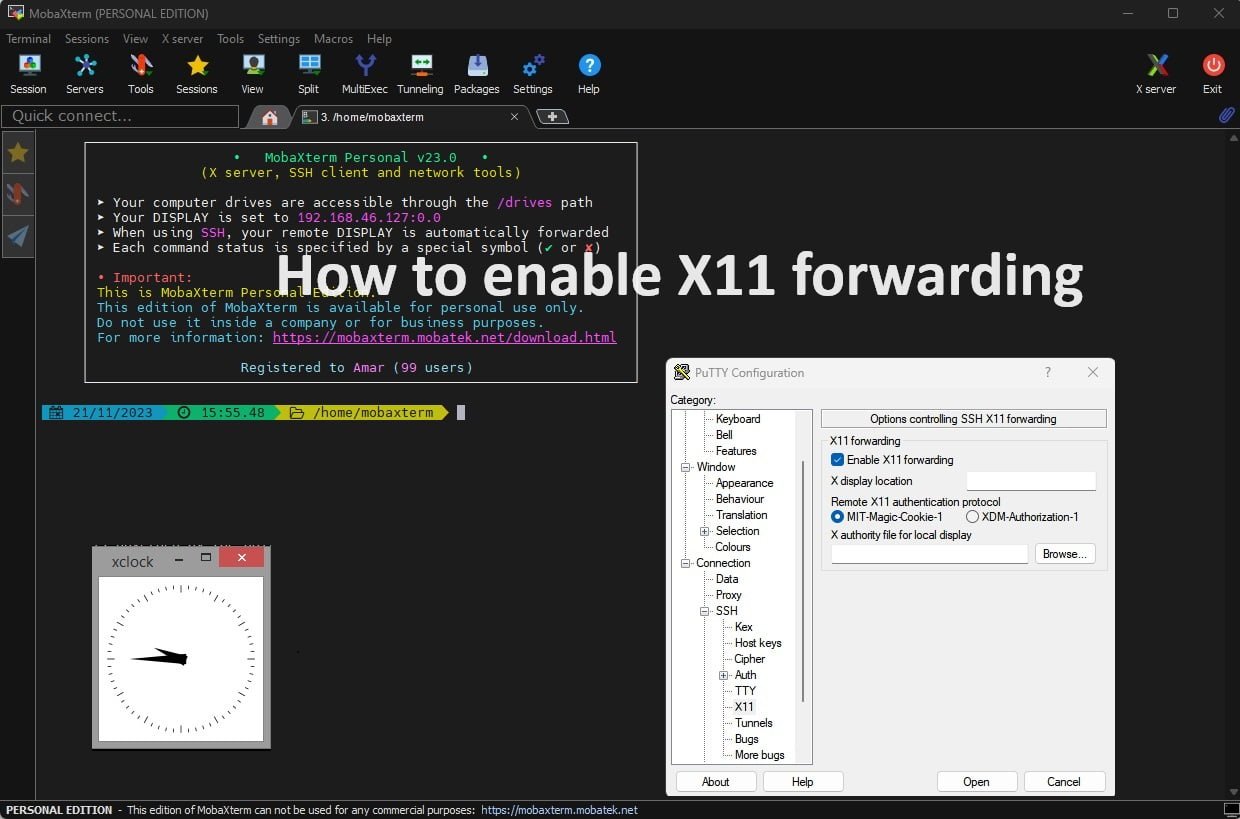
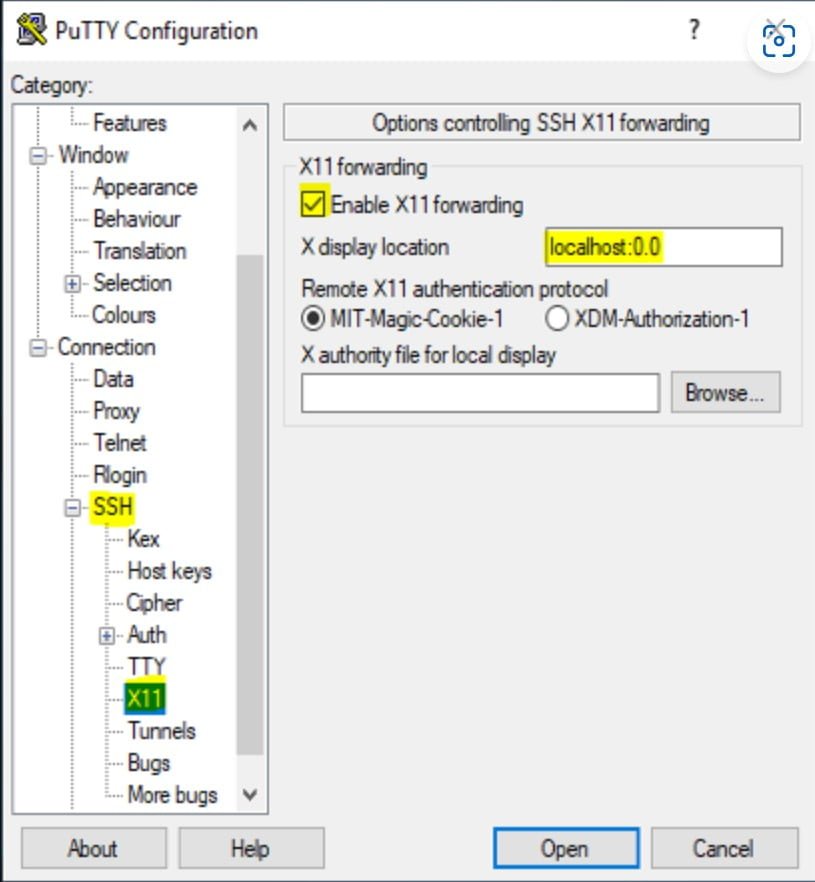
- Go to Connection, select SSH, and then click on Then, select enable X11 forwarding.
- Set X display location as localhost:0.0
- Go back to Session and click on Save after creating a session name in Saved session.
Now that you’ve got PuTTY, Xming, and your X11 settings all set up, simply click the ‘load’ button and then the ‘Open’ button. This will open a new SSH terminal with X11 forwarding enabled. Now, let’s move on to testing X11 forwarding.
Check if X11 is working for your current login:
Example:
xauth listexport DISPLAY=localhost:10.0$ xclock or xterm
xclockLook at the sample output and check if an xclock or xterm window appears like the image shown. If you see this, it means that your x11 forwarding is working correctly, and you can begin using GUI-based applications for installation or configuration by running the installer or configuration tools

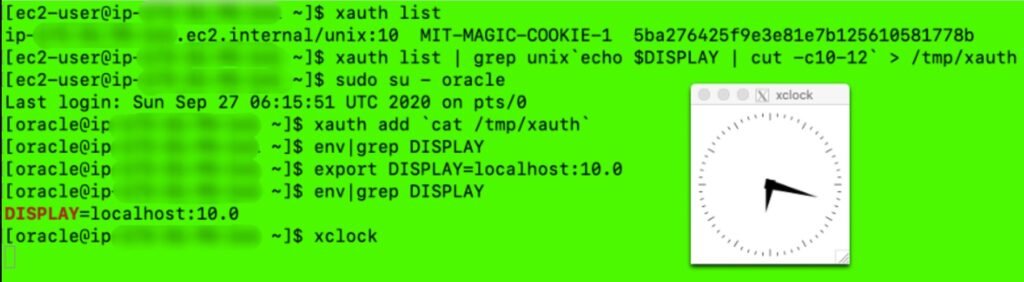
Step 4: To set up X11 forwarding on your EC2 Linux session when switching to a different user to run GUI-based installation or commands, follow these steps.
In this example: ec2-user is the user logged in with SSH and then switched to oracle user.
From the Logged User to identify the xauth details:
xauth listenv|grep DISPLAYxauth list | grep unix`echo $DISPLAY | cut -c10-12` > /tmp/xauthGo to the user you want to use for running installations or tools with a graphical interface:
sudo su - oraclexauth add `cat /tmp/xauth`xauth listenv|grep DISPLAYexport DISPLAY=localhost:10.0xclockMake sure to check the sample output, where you’ll see an xclock or xterm window that looks like the provided image. This confirms that your X11 forwarding is functioning correctly, even when you switch to a different user. At this point, you can start using graphical applications, like running installers or configuration tools.
Conclusion
In this blog, I showed you how to set up Amazon EC2 instances on different Linux-based systems to send their graphical interface (X11) to a Windows OS-based bastion host. This is handy for installing applications with a graphical user interface. It’s also great for secure and fast SSH operations on bastion hosts, without needing extra network setup, just open port 22 for SSH. Give this tutorial a try and share your feedback!